De-candling Dual Flush Pines
The following technique may be used to get even shorter candles than by breaking them. However, this is only applicable to very healthy dual flush pines - black and red pines. Single flush pines don't have the energy to grow two sets of candles in a year and you may kill the entire branch if you use this technique on those pines..
Cutting the candle will force new buds to form at the base of the old candle. These will turn into more than one candle - so more options for us to produce fine branching. And they will be shorter than the original candle.

When to Cut Candles
When you cut candles will influence how long the second flush of growth will be. On shohin you want needles and candles to be as short as possible so you will want to cut the candles as late as possible. However, needles that are only 1/2-inch long might not look good on your larger tree so you will want to cut candles on that tree earlier.
However, the candle still needs to be green when you cut it. Because candles are only green for about 3 weeks what you really will be doing is cutting the candle on shohin just as the candle is turning light brown / gray. And cutting larger trees soon after the needles have fully emerged. In the Palo Alto area candles are typically fully emerged sometime mid-June to early-July depending on the weather that year.
But there are a couple more things you should check first:
Only cut candles if the needles are bright green and free of insects
Candle must still be green. If it's starting to turn light brown / gray, you've waited too late. You’ll have to wait until next year.
Only if the tree is strong. Weak trees should only have candles cut every other year
We recommend cutting all candles at the same time - but to vary the length of the stub being left. Specifically, we want the stub length to vary according to the size of the candle and its location on the tree. Here's how this works and why we care. Stubs that are different lengths die back at different rates. Longer stubs will take longer to die back which means that when new buds form at the base of the candle they will start growing (aka "pushing") several days later than on shorter stubs. As a result, the new candles will be more nearly the same size.
How to Cut Candles
Your scissors should be extra sharp for a clean cut. Make sure that you make your cuts perpendicular -- cutting a candle on a slant means dormant buds at the base will get an uneven start.

Keep Cuts Perpendicular to candle
Pine trees grow more strongly at the top of the tree, so candles at the top will always be longer than the candles at the bottom of the tree. Candles on the tips of the branches receive more sun than candles closer to the trunk and be stronger than those that are partially shaded. By adjusting the size of the stub left after cutting we can slow down stronger candles and allow weaker ones to become stronger - resulting in more balanced growth.
Candles that are already very small (e.g. 1/4-inch long or hidden inside the tree) shouldn't be cut. Leave them alone.
Upper Branches
Cut candles on upper branches so that the stub remaining is between 1 to 1.5 times as long as the diameter of the candle.

Candles on Top Part of Tree

Mid-Level Branches
Cut candles on middle branches so that the remaining stub is about the same as the diameter of the candle.
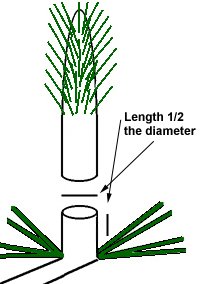
Lower Branches and "Inside" The Tree
Cut candles on Lower branches so that the remains stub is about 1/2 the diameter of the candle. Do the same for candles that are "inside" the tree (partially shaded).
Fertilizing After De-Candling
After de-candling you want the second flush of growth to be short. If you're using Osmocote or similar timed-release pellets those deliver a lot of nitrogen - and nitrogen promotes green growth. We don't want that, so remove the Osmocote. You can add some 0-10-10 fertilizer if you want.
Choosing Buds for Future Branches
Two weeks after you've cut candles you should see new buds growing at the base of the shortest stubs. Candles will begin growing a bit later at the base of longer stubs - that's by design. This gives a head-start to new candles on parts of the tree that were weak.

New buds growing from old candle base

Identify new buds
The next phase of work is to identify which buds you want to develop into new candles. There may be several new buds, but you'll remove all unneeded buds. Here's how to choose which to keep and which to cut off.
Because you want two branches that are "opposite" each other you might choose to keep the buds shown to the right. But it's a bit more complicated than that.
The goal is to have two horizontal branches, so if there are more than two buds you'd pick two and remove the rest. There are a few cases to consider. Look at the figure below. In this case the ones on the top left and right are the obvious choice to keep.

Choose your buds
But, you want the new branches to be of equal strength. On this tree the two largest buds are on the bottom. The branch could be rotated by wiring it at this stage it is easy to break off buds. Better to wait a few months to let the buds turn into new candles and become stronger. If the strong buds were on opposite sides of the branch we'd use them, but in this case it makes sense to remove them.

Remove the largest buds
Remove the strongest buds
Now look at what's left. We've still have two buds that are opposite each other and similar size so we'll use those and remove the remaining one. Each candle is different but hopefully these examples will help you decide how to choose the buds to use and the ones to remove.
Fertilizing After Hardening
After a few weeks the new growth will have hardened off (black pine needle tips will be sharp to the touch) you want to add nitrogen to support new buds which form in late-August to early-September. These are the buds that will begin growing next spring. Nitrogen will make them stronger. You can add Osmocote at this time.
Fertilizing When Dormant
In late-fall pine trees go dormant. This means that the upper part of the tree has stopped growing. The roots will continue to grow during the winter and they continue to need nutrients from fertilizer - just not nitrogen. Remove all fertilizer with nitrogen at this time and replace with one without nitrogen. See Fertilizer Basics for more details.
